Featured

A New Home

Our new homepage!

Today’s blog post is a little different than usual – instead of a recipe or some cooking tips, we want to share some news with you all. We’ve been using WordPress for awhile and we’ve gotten pretty comfortable with how the platform works, but unfortunately, it doesn’t offer all of the features we’re looking for. After considering a few different blogging hosts, we’re happy to say we’ve decided to move Mix It Up to a new home on Wix! We’ll keep this blog up and running, but we won’t update it anymore. Instead, you’ll be able to find all of our new posts here. We’re also importing all of our posts from this blog over to the new site, so everything will be in one place. Our new website has some great features – you should click over to see all of them, but here’s a taste of what you can expect: 

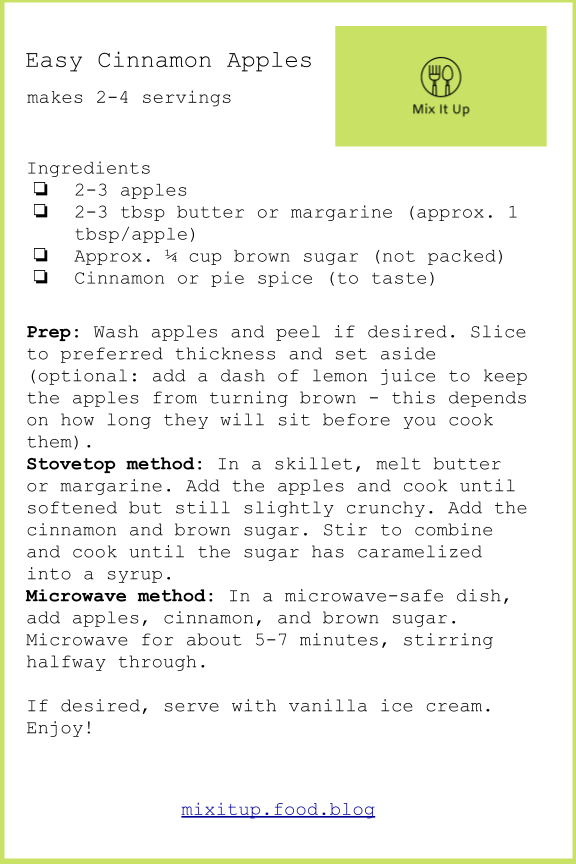
  • All our recipe posts on the new site will have recipe cards for you to download and print out! This is something we’ve wanted to implement in our posts for awhile, and after playing around with some different options we finally figured out a good way to include them. Now you’ll be able to find a printable recipe card at the end of each of our recipe posts!
  • Did you know we have an Instagram? Our homepage on the new site features our Instagram feed, so you can access it directly from our blog! We update our Insta pretty regularly and post lots of pictures that don’t make it to the blog. Make sure to follow us – @mixitup96 – to stay updated about all of our cooking adventures! 
  • The layout of our new site is a lot more intuitive and easy to navigate – at the top of each page, you can find post categories, links to each page on the site, and all of our contact info and social media. 
  • We’re planning to start up a monthly newsletter to highlight our posts from each month, plus some bonus content such as recipe ideas, our favorite foods from the month, and some tips and tricks that don’t make it onto the blog! We’ll post about it on the new website and our Instagram when we do, so make sure you’re following us to hear about it right away!

Thank you to everyone who followed this blog – please join us as we continue our cooking journey on our new website! 

Find our new blog here: mixitupblog.wixsite.com/blog

❤ Juliana and Sarah

Recipe: Pasta Salad

Photo by Kaboompics .com from Pexels

Pasta salad is a great make-ahead dish, especially on hot days! A box of pasta is pretty cheap (usually about $1.00/box), and if you have a university meal plan, you can get lots of toppings for the salad from your campus dining locations. Even if you don’t have a meal plan, there are lots of cheap ways to buy these add-ins – take a look at our past posts for some tips on keeping your shopping inexpensive. Read on for some of our favorite variations and recommendations for this yummy summer dish! 

Photo by Eaters Collective on Unsplash

Changing up the kind of pasta you use is a great way to keep your pasta salads interesting! We are partial to the classic tri-color rotini, but we’ve experimented with various other kinds of pasta to keep flavors and textures fun. Another way to add variety to your pasta salad is using different toppings – there are so many ways to vary what you add in to keep things original. In the summer, we try to use seasonal veggies such as cucumbers and tomatoes. Local markets or farm stands are a great place to check for fresh, in-season veggies! If you eat meat, pepperoni and/or cheese are great protein sources to add to your salad. If you are looking for a vegan variation, try using cannellini or garbanzo beans for protein! Another good way to spice up a pasta salad is to use fresh herbs (such as oregano or thyme) to add a fun bite. 

Image by TheAndrasBarta from Pixabay

Dressing is the icing on the cake! Of course, the classic Italian dressing is always yummy for pasta salad, but we love experimenting with different dressings! We love goddess dressing, Greek dressing, or something tahini-based to mix it up (pun totally intended!). And who says pasta salad has to be served cold? We live in a chilly region (especially in the winter), and hot pasta salad is totally underrated! We love mixing in asparagus and spinach and serving it with pesto, or adding roasted vegetables with olive oil and a yummy seasoning blend! 

Recipe: Basic Pasta Salad 

Ingredients: 

  • Pasta of choice (we recommend tri-colored rotini, but you can use whatever you prefer or have on hand)
  • Add-ins of choice: 
    • Fresh veggies: cucumbers, tomatoes, bell peppers, broccoli, cauliflower, carrots
    • Protein: pepperoni, salami, cheese, cannellini beans, garbanzo beans 
    • Other: green olives, black olives 
  • Dressing of choice (we recommend Italian or Greek dressing) 

Bring a large pot of salted water to a boil and add the pasta. While the water is boiling/the pasta is cooking, prep your add-ins: wash and chop your veggies, drain the beans, cut up the cheese, snack on some olives. When the pasta is done, drain and rinse it before transferring it to a large bowl. Add the toppings and dressing. Let chill in the fridge until time to serve, and enjoy!

❤ Juliana and Sarah

Tips and Tricks: Meal Planning

Photo by Vegan Liftz from Pexels

Meal planning is something we only started this year, but as busy students it’s helped us so much! Our campus dining hall posts menus in advance, so each weekend we like to take a look at the upcoming week and decide when we want to eat on campus and when we want to cook for ourselves. We gather our favorite recipes, take stock of our dorm pantry, and figure out what meals we want to make that week and what groceries we need to pick up. Taking the time to plan in advance helps us stay mindful about what we eat, and going to the store with a plan in mind helps us avoid buying random ingredients. Read on for some of our tips to get started meal planning yourself! 

  • Find recipes
    • After we compare weekly schedules and decide when to cook together, the first step of our meal planning process is to figure out what we want to make. We’ve collected a handful of go-to recipes (many of which we’ve posted on this blog) so we usually pick a few of those, and maybe a couple new recipes to try. If you’re not sure what to make, pick an ingredient you like and search for recipes that use it. We like Pinterest because it suggests related recipes as well, but a simple Google search is enough to get started! 
    • Making food with ingredients you like is an important part of choosing a recipe, but so is taking your kitchen space into account. There are dishes we like to cook at home that we can’t make at school, simply because we don’t have the space or the right appliances. Make sure you have all the necessary supplies for a recipe before buying ingredients! 
  • Getting ingredients – campus locations, grocery store, local markets
    • Once we decide on the recipes we want to make, we have to figure out where to get our ingredients. Since we both have a school meal plan, we often get ingredients from campus dining locations – salad bars are great for picking up fresh veggies, and we can usually get fruit (apples, bananas, peaches) from our dining hall. Since we’ve already paid for our meal plan, getting ingredients on campus is usually more cost-effective than going to the grocery store. Another great option (if you have access to one) is a local market – if you have access to one, markets are a great place to check for in-season produce! However, some ingredients (such as pasta, grains, and beans) are best bought at a grocery store. 
    • Keep price in mind when shopping! We are often on a super tight budget, so we buy a lot of store brands and dry ingredients (such as dried beans and rice) in order to save money. Another great way to save money is to use loyalty programs, apps (we like Ibotta!), and coupons. This keeps the overall price down, and with Ibotta, you get to try new products AND save money.
    • How often you’re able to get to the store will influence what you buy, and it’s important to plan your meals around how often you can buy groceries. We usually go to the store every two weeks, so we tend to buy lots of canned beans and shelf stable food in order to last until we can go back to the store. However, if you can shop often, we recommend buying plenty of produce! We tend to use fresh produce from the store right away and save our shelf-stable food for later in the week, adding fruits and veggies from campus locations. 
    • Use your recipes to make a list of all the ingredients you need and plan to only buy those at the store – don’t walk in without a plan, because you’ll probably end up buying random ingredients and it’s easy to waste money this way. We started using Google Sheets to meal plan, because it’s a free program and we can collaborate on the document, but a good old-fashioned piece of paper works just as well too! 

We hope these tips helped spark some ideas for your own meal planning! Feel free to comment or get in touch with us if you have any questions or suggestions. 

❤ Juliana and Sarah

Recipe: Fruit Crisp

Fruit crisp is such a delicious and satisfying dessert, it’s hard to believe how easy it is to make! We make it whenever we have people over for dinner or want to make something extra for dessert – it’s great served warm with vanilla ice cream, or even cold leftovers the next morning (the fruit means it definitely counts as breakfast, right?). 

Blueberry crisp, fresh from the oven!

Like our cinnamon apples, when we make a crisp at school we usually get fruit from our dining hall. We tend to use apples most often, but berries and peaches work well too! You can even combine various fruits – blueberries and peaches are one of our favorite combinations. 

Served warm with ice cream is our favorite way to have this dessert!

Recipe: Fruit Crisp 

Makes 6-8 servings; recipe is for a 9”x13” pan. If serving a different number of people, adjust pan size and ingredient amounts accordingly. 

Ingredients: *

  • Fruit of choice (we recommend blueberries, peaches, or apples!) 
    • Use enough to fill your pan almost to the top and leave room for the crisp topping. For a 9”x13” pan, about four quarts of berries or sliced fruit is a perfect amount.
  • White sugar 
    • 2 tbsp
  • Cornstarch 
    • 2 tbsp 
  • For the topping:
    • Flour 
      • 1 cup 
    • Oats 
      • 1-1 ½ cups 
    • Cold butter or margarine 
      • 1 stick (½ cup) 
    • Brown sugar
      • ¾ cup 

Preheat oven to 350℉. Wash fruit. Grease your pan with butter, margarine, or cooking spray and slice the fruit directly into the pan. Sprinkle cornstarch and white sugar over top. To make the topping, cut the cold butter or margarine into the flour using a food processor (if you don’t have a food processor, cut the butter into small chunks and mix with flour until the mixture looks like coarse crumbs. Use a pastry cutter, butter knives, or a fork, but not your hands, as the heat from your hands will cause the butter to soften). Add the oats and brown sugar to the flour/butter mixture and combine, then sprinkle on top of the fruit. Bake until the fruit is soft and the topping is crisp, about 45 minutes. If desired, serve warm with vanilla ice cream. Enjoy! 

*All measurements are approximate, and can easily be adjusted to suit personal preference. To adjust quantities, it’s important to understand the purpose of each ingredient:

  • Fruit: the foundation of the crisp. Adjust quantity depending on how many people you’re serving/how big your pan is. 
  • White sugar: supplements the natural sweetness of the fruit. If you want a sweeter crisp, use slightly more sugar; if you want less sweetness, use slightly less. 
  • Cornstarch: helps thicken the juice released by the fruit as it cooks. This allows the crisp to be gooier, rather than liquidy. The amount of cornstarch used depends on personal preference and how much liquid the fruit will release as it cooks; berries tend to release more, and will therefore need more cornstarch, while apples need very little or no cornstarch at all. 
  • Flour: part of the base for the topping. Coats the butter and helps hold the topping together. 
  • Oats: part of the base for the topping. As the crisp bakes, the butter will melt onto the oats and make them crispy. If you need to increase the amount of topping you’re making, increase the oats and butter but not the flour (to keep the topping from being too dry or floury). 
  • Cold butter/margarine: melts as it bakes and makes the crisp “crispy.” The colder the butter, the better; you want it to melt in little “pockets” as it bakes, and keeping it cold will help with this. 
  • Brown sugar: adds sweetness to the topping and adds to the crispiness of the topping by caramelizing as it bakes.

❤ Juliana and Sarah

Tips and Tricks: Dorm Cooking Supplies

Photo by Ash Wednesday on Unsplash

Today’s post is a continuation of our last post about kitchen supplies, except this week, we’re getting more specific and talking about what we ourselves use in our dorm room on a regular basis. Read on to discover what appliances we get the most use out of, and what we recommend to build your own dorm kitchen!

  • Microwave
    • We knew we would use our microwave pretty heavily, so during our freshman year we invested about $70 in a microwave from Target. However, lots of times you can find decent microwaves used or cheap, and depending on your school, you might even be able to rent one for the semester/year. A microwave is a great appliance for a dorm room – there’s lots of recipes online for microwave meals that are easy to make in a small space, and of course it’s nice to heat up your leftovers or the tea you forgot about! 
  • Mini fridge 
    • A mini fridge is another appliance that’s great to have in a dorm room – it’s super helpful to be able to store cold food and leftovers, and fresh foods like fruit and veggies tend to stay fresh longer if kept in the fridge. If you have space, it’s a good idea to get a large one with a decent-sized freezer – it might not seem necessary at the time, but having freezer space is helpful when planning meals and grocery shopping in advance! Like microwaves, some schools have the option to rent a mini fridge for the semester/year, which is a great cost-effective option. 
  • Coffee pot 
    • If you don’t want to pay for school coffee, a coffee maker is essential! We love ours because (let’s face it) who wants to go anywhere on campus before your daily caffeine fix? As a high school graduation gift-to-ourselves, we invested in a $100 Hamilton Beach coffee maker with a single serving attachment; however, if you’re not planning on using it heavily, there’s plenty of inexpensive coffee makers that will get you through school! There are also lots of hacks for cooking with your coffee makers, such as steaming veggies and making ramen. If you’re only an occasional coffee drinker, you could consider a French press or single serving coffee maker, such as Keruig (or a Keruig-like off-brand).  
  • Electric kettle 
    • An electric kettle is another essential appliance in our dorm. Both of us regularly drink tea, and not a day goes by when one of us doesn’t switch the kettle on in the morning (or afternoon… or evening…). We found ours for pretty cheap on Amazon, but you can check stores like Target or Ikea as well. Like coffee makers, there are a lot of hacks and creative ways to use an electric kettle that you can find online (check out Pinterest for some ideas!) 
  • Crock pot 
    • We bought a 2qt slow cooker from Target for about $12, and we use it all the time during the school year! We usually make soups or stews, but slow cookers are also great for dips, fondue, and hot drinks. If you’re comfortable cooking meat, you can use a slow cooker for dishes with chicken, pork, beef, sausage, or whatever else your recipe calls for. As you can tell from this blog, we love to cook a lot of our own food, but other responsibilities tend to take time away from our meal prep. It’s a wonderful feeling to throw ingredients into our slow cooker in the morning and come home after a busy day to a hot, delicious meal! 
  • Sandwich maker, waffle maker 
    • These were items we owned before college; we don’t use them super often in our dorm, but every now and again we break them out for a pancake night! If you’re not a fan of pancakes, waffles, or sandwiches, there’s lots of recipes online for different dishes you can make with these appliances, such as calzones or mountain pies. 
  • Bread machine 
    • We bought a bread machine for the spring semester of our sophomore year, after we had gotten our feet thoroughly soaked in the world of college cooking. It was a big investment, but by that time we knew cooking was going to be a constant in our dorm lives, and fresh baked bread was exactly what we wanted to add to our tiny kitchen. Bread machines can get pricey, and they can take up a lot of space in a cramped dorm room, but if you like to cook and bake a lot we definitely recommend looking into buying one! If you take care of it, it will last for years, and fresh bread is a surefire way to win your roommates’ affection. 
  • Pots and pans
    • We found a great set of nice pots and pans at Target for $44.99; it came with 4 sizes of pots/pans along with 5 cooking utensils and 3 lids. It was perfect for us, but depending on your personal cooking style and storage options, a different set of pots and pans might be better for you. If you only need one or two, you can also buy individual pots and pans; however, it often ends up being cheaper in the long run to buy them in a set. 
  • Set of knives
    • Good kitchen knives are another worthwhile investment for up and coming chefs. We found a set on Amazon that came with 6 knives for $25. Again, buying a whole set of knives isn’t always necessary, but it can be cheaper to buy them in a collection rather than individually. We have different sizes of paring knives and serrated knives (good for cutting/chopping veggies), as well as a bread knife (which has gotten a lot of use since we brought home a bread machine!). Similar to pots and pans, your style of cooking and cooking needs might differ from ours, so do some research before investing in kitchen knives to see what best fits your needs! 
  • Silverware and dishes
    • Buying paper products is unsustainable and can get expensive, so we recommend some basic silverware and dishes for your dorm! Make sure the dishes are microwave safe (because you’re a college student, and we know you’re cooking more in your microwave than you care to admit…). We have a collection of various plates, bowls, and mugs that we’ve bought from places like Target, Ikea, and thrift stores; we’ve also received some from families “cleaning out” their kitchens (no one is above nicking a few spoons and forks from home!).
  • Cooking utensils 
    • Most of our utensils came in a set with our pots and pans, but there’s a few others we picked up when we needed them. These are what we currently own and use: spatulas (silicone mixing spatula and flat plastic spatula), various serving/stirring spoons, whisk, ladle, and various knives. Kitchen utensils are the kind of thing we’ve collected gradually over time – they’re pretty inexpensive on their own, so we’ve never bothered to buy a set of them.  
  • Hot pads/oven mitts 
    • These are often overlooked, but they’re absolutely essential if you’re planning on cooking with an oven! Check stores like Target and Ikea, and make sure to pick up more than one; we have four or five hot pads between the two of us, and use all of them constantly.
  • There are a few additional cooking/baking supplies we’ve picked up: sheet pans (various sizes), 9×13 cake pan (good for cakes, casseroles, and desserts like fruit crisps or brownies), bread pan (we use this for quick breads when getting the bread machine out is too much of a hassle), pie plate (bought used from a thrift store), and a set of measuring cups and spoons. These are just odds and ends that we’ve collected along our cooking journey, but we’ve gotten tons of use out of all of them!

We hope this list has inspired you and given you some ideas for you own dorm kitchen! As always, feel free to let us know if you have any questions, comments, or suggestions.

❤ Juliana and Sarah

Recipe: Easy Cinnamon Apples

Photo by Sarah Gualtieri on Unsplash

Apples tend to be pretty inexpensive and easy to come by, and you can make so many yummy recipes with them – a pie or a galette; fruit salad; or one of our favorites, pan-fried cinnamon apples. Delicious on their own or served with vanilla ice cream, cinnamon apples are an easy and well-loved dessert! 

We usually make these recipes at school, but we love cooking at home for our families too!

We usually get apples from our college dining hall when we want to make this dish. The kind of apple you use doesn’t matter too much, but lots of people recommend Granny Smith for baking and cooking with. Feel free to use whatever you have on hand, though! Besides apples, regular ground cinnamon, butter or margarine, and brown sugar are all you need to make this yummy dessert. If you have it, you can substitute pie spice for the cinnamon to bring some extra flavors to the pan! 

You can peel the apples if you want, but they’re just as a-peel-ing if you don’t!

Recipe: Cinnamon Apples (makes 2-4 servings) 

Ingredients:

  • 2-3 apples ($0.50/apple) 
  • Butter or margarine ($2.29/container) 
    • Approx. 1 tbsp per apple
  • Cinnamon or pie spice ($1.00/container)
    • To taste
  • Brown sugar ($1.49/container) 
    • Approx. ¼ cup (not packed) for three apples; use more if you want more of a syrupy sauce 

Supplies: 

  • Knife ($3.99)
  • Skillet ($9.99)

Prep: Wash apples and peel if desired. Slice to preferred thickness and set aside (optional: add a dash of lemon juice to the sliced apples to keep them from turning brown – this depends on how long the apples will sit until you cook them). 

Stovetop method: In a skillet, melt butter or margarine. Add the apples and cook until softened but still slightly crunchy. Add cinnamon and brown sugar. Stir to combine and cook until the sugar has caramelized into a syrup. 

Microwave method: In a microwave-safe dish, add apples, cinnamon, and brown sugar. Microwave for about 5-7 minutes, stirring halfway through. 

Serve hot, with vanilla ice cream if desired. Enjoy! 

Click to download our printable recipe card!

❤ Juliana and Sarah

Tips and Tricks: Kitchen Supplies

Photo by Sven Mieke on Unsplash

Moving out of your childhood home means that all of a sudden, you have to go out and buy all of those kitchen supplies that your parents have always had. This is one of the hardest parts about cooking in a dorm or small apartment – how do you know what to buy first? How much money should you spend? When should you prioritize price vs quality? Figuring out what supplies and appliances to invest in is difficult, but luckily we have some recommendations! 

Kitchen knives are an absolutely essential kitchen tool. We recommend three different kinds of knives: small, large, and serrated. Small knives are perfect for chopping fruit and small veggies, while a large knife is perfect for cutting squash and other larger vegetables and fruits. A large serrated knife can be used for multiple purposes since it works well for cutting bread and vegetables like zucchini. Veggies with skin, like cucumber or zucchini, are easier to cut with a serrated blade – it helps break through the skin. We found a set of six knives on Amazon for $25, and they work wonders! You don’t need fancy or expensive knives to make a great meal – just make sure you have the basics. 

A sheet pan or two is possibly the greatest investment you could make for your dorm kitchen. A dark, nonstick sheet pan will hold up better than a cheaper pan (which is something we learned the hard way!). We found a $5 sheet pan at Target, and it’s been perfect! To extend the life of your sheet pans, try using parchment paper to prevent food from sticking to the pan itself. We have two different size sheet pans and a cake pan (deeper than sheet pans), and they cover any job we could need them for.

A set of nonstick pots and pans can be pricey, but buying them in a set ends up being cheaper than buying them individually. A stock pot, skillet, and two or three pans in different sizes should be a good start for a small living space, although of course the pans you use most will depend on your own cooking practice. We bought a set from Target for about $45 – it was a pricey investment, but a good set of pans will last for years and years.

Mixing bowls are another kitchen essential, especially for people who like to bake. We love making banana bread, but we desperately needed a mixing bowl for it! We headed to Target, grabbed a big glass bowl we found on clearance, and now we use it for EVERYTHING. 

Some miscellaneous tools that people tend to forget are pot holders/hot pads, strainers, & spatulas and other baking utensils. These items are cheap and easy to find, but people often overlook them during their initial dorm or apartment shopping. 

The following items are useful depending on personal cooking style, but they aren’t absolutely essential. Remember that cooking is personal and this isn’t a “one size fits all” list!

We have fallen in love with our small slow cooker! We have a 2-quart crockpot that we found for $10 at Target (can you tell where we like to shop for cooking supplies?) and it’s perfect for making 2-4 servings of different soups. We love using leftover veggies to make unique vegetable soup in the crockpot – just throw all of your ingredients in the pot and let them cook all day! It’s an easy way to make a delicious meal on a busy day.

A food processor and/or blender is a great option for creamy soups, smoothies, and anything in between! The best option for storage is a blender with a food processor attachment, but of course it depends on your personal cooking needs and budget. 

A mini waffle maker does so much more than make waffles! They are usually priced around $10, and you can use one to make pizza pockets, hash brown patties, and of course, waffles.

When we bought a bread machine, our whole lives changed! That might be a little dramatic, but it has definitely been a game changer. Bread machines can be an expensive investment, but fresh baked bread is one of the best things on the planet. We share bread with friends and make a loaf for ourselves at least once a week. There are so many variations on white bread that you can try with a bread machine! It is also great for making your own gluten free or vegan bread. If you can’t invest in a bread machine, a loaf pan is also great to have on hand, and you can use it for lots of recipes besides bread as well. 

We hope these tips have helped you figure out what supplies and appliances to stock your own kitchen with!

❤ Juliana and Sarah

Recipe: Zucchini Chips

Image by congerdesign from Pixabay

These zucchini chips make a great healthy summer snack! Fresh food tends to be more available in the summer, which means more yummy veggie recipes. Zucchini chips are indulgent and fresh, which makes them the perfect snack to eat by the pool or as a side dish at a cookout. We find that Trader Joe’s “Everything but the Bagel” seasoning is perfect for these delightful snacks, but you can use whatever seasoning you prefer!

Thin slices work best for crispy chips!

Zucchini is super easy to find during the summer – if you can, it’s definitely worth it to buy fresh from a local farm stand or market, but if that’s not an option, you can always find it at the grocery store. Trader Joe’s grocery chain makes a delicious seasoning blend called “Everything but the Bagel” which is perfectly suited to these chips. If there’s no Trader Joe’s around you, you can find lots of recipes for this seasoning blend online, or check your local grocery store for an off-brand blend.

Seasoned and ready to go into the oven!

Zucchini Chips (makes 2-3 servings/zucchini)

Ingredients: 

  • One zucchini ($1.00/zucchini) 
  • Olive oil ($0.20/serving) 
  • Everything But The Bagel seasoning ($4.00/container) or preferred seasoning blend

Supplies: 

  • Sheet pan ($5.00)
  • Knife ($3.99)

Preheat the oven to 325℉. Slice the zucchini into thin slices (the thinner the better!). Arrange the zucchini slices onto the sheet pan and drizzle olive oil over them. Shake the seasoning blend over the zucchini slices and roast for 10-15 minutes, depending on thickness of the slices. Enjoy!

Recipe: Beans and Rice

Photo by Manfred Pecha on Unsplash

This dish is one of the very first meals we learned how to cook at school! Beans, tomatoes, and peppers mixed with rice leads to an easy and simple but satisfying dinner. We’ve made it in the microwave and in a slow cooker, and you could easily adapt the recipe for stovetop as well. Play around with the flavors and adjust them to your liking – we tend to keep the heat moderate, but you can add more spices or hot sauce to bring the spice up to where you want it. 

We couldn’t wait to take pictures – we had to dig in right away!

This dish is a great way to use up fresh peppers and tomatoes that are nearing the ends of their lives. If you don’t have enough fresh tomatoes, you can supplement with canned; we usually throw in a small can of diced tomatoes with green chili peppers. We tend to make microwave Minute Rice to go with the beans, just because it’s quick and easy, but feel free to use whatever rice you have on hand! There’s lots of different ways to serve this dish – we prefer either a bowl or plate of rice with beans on top, or combining the two in a tortilla to make a simple burrito!

Beans, rice, and a fruit salad make an easy, satisfying dinner!

Rice and Beans (makes 2-4 servings)

Ingredients:

  • Onion ($0.23/serving)
  • Minced garlic ($0.03/serving)
  • Bell peppers ($0.50/serving)
  • Kidney beans ($1.00/can) 
  • Fresh tomatoes ($0.37/serving)
  • Canned tomatoes ($0.69/can)
  • Hot sauce ($0.06/serving)
  • Salt and Pepper (packet drawer)
  • Rice ($0.25/serving)

Supplies: 

  • 2-quart slow cooker ($11.99)
  • Microwave-safe bowls ($1.99 each) 

Slow Cooker Method: Rinse beans in a strainer and slice onion, bell pepper, and fresh tomatoes. Layer ingredients in slow cooker in order: onion and garlic, bell peppers, beans, canned and fresh tomatoes. Season each layer to taste with salt, pepper, and hot sauce (and/or other desired seasonings) as you go. Cook on high for 3-4 hours or low for 5-6 hours. Prepare rice before serving and enjoy! 

Microwave Method: In a (large!) microwave-safe bowl, combine beans, bell peppers, onion, garlic, and tomatoes. Season with salt, pepper, and hot sauce to taste and microwave until hot (approximately 3-5 minutes – check at various intervals). Microwave Minute Rice according to instructions on box. Serve and enjoy!

❤ Juliana and Sarah

Tips and Tricks: Potatoes

Photo by Monika Stawowy on Unsplash

Can you get a more versatile, adaptable food than potatoes? We haven’t found one yet! Potatoes are one of our favorite foods to cook with – they’re filling, healthy, and make a great addition to almost any meal. Read on to find out some of our favorite things to do with this amazing food! 

  • One of our favorite ways to prepare potatoes is to roast them alongside some fresh veggies. Simply wash and chop the potatoes, coat with olive oil and your desired seasoning(s), and roast at 425℉ for about half an hour. Potatoes tend to take on the flavors of whatever they’re cooked in or with, making it super easy to customize this dish to your own flavor preferences!
  • Homemade mashed potatoes are a little labor-intensive for the average college student, but if you have a free afternoon and an empty kitchen they’re so much better than their instant counterpart! Just peel the potatoes and boil until they’re soft, then mash them with butter, salt, pepper, and a splash of milk. Impress your family and friends at your next big dinner! 
  • Baked potatoes are a super easy dish to make. You can even cook them in a microwave if you don’t have easy access to an oven! Whether you go with a microwave or the more traditional oven path, make sure to scrub the potatoes first and prick them with a fork before cooking! 
    • If you make a large batch of baked potatoes and end up with leftovers, try using them in a breakfast hash or in a potato salad (potatoes, mayonnaise, hard boiled eggs, olives, celery, salt & pepper). 
  • Try making your own hash browns! Just shred or dice potatoes, soak in cold water and dry, and brown with butter and seasonings!
  • Potatoes also make a great addition to soups and stews! They’re an easy way to stretch a dish and make it more filling, and blend seamlessly with most flavors. Try them with some fresh or frozen veggies in a vegetable soup

❤ Juliana and Sarah

Design a site like this with WordPress.com
Get started